Bra Fitting Guide
For information on how to find your most comfortable fit, please see my post at Better Bras Canada, which explains how to find your starting point size, troubleshoot, and locate bras within Canada or online.
For definitions of general bra fitting terms, check out this page at F/FF: Fitting and Feminism.
—
Basic Fitting Checklist:
- Your cups should encase all of your breast tissue without creating lumps and bumps. Ideally we’re looking for a smooth line where your breasts meet the cups. Be sure to scoop any breast tissue from your armpit area into the cups. Are your breasts spilling out the front or sides of your cups? Try a cup size up. Wires feel too tall or wide, or empty space at the top of your cups? Try a cup size down.

Example of fitted cups
- Your band should lay horizontal across your back, snug enough to stay in place throughout the day. The band should carry roughly 80% of the weight of your breasts. Finding you need to pull down your band during the day? Is your band more familiar with your shoulder-blades than your back? Try a size down. Finding you can’t comfortably take a deep breath? Feel constricted by your wires or band? Try a band size up.

Example of a fitted band.
- The center gore (where the wires meet between the cups of your bra) should lay flat and tack against your sternum. A bra that does not tack usually means one of two things: the cups are too small, or the bra style simply doesn’t match your breasts. Try a cup size up, or find styles with more cup depth.

Notice how the wires remain flush with my body? These wires are tacking and containing all of my breast tissue.
- Your straps should be tight enough to remain on your shoulders without slipping off as you go about your day, and get rid of any slack at the top of your cups. If you find you need to loosen your straps a lot to keep your breasts from spilling out of your cups, try a cup size up. Alternately, if you have to tighten your straps a lot to get rid of excess wrinkling in the cups, try a cup size down. Please refer to the middle photo, which not only shows a fitted band, but also appropriately adjusted straps.
Finding Your Starting Point Size
To find your size, use two measurements: one over your bust, and one around your rib cage. I must stress that this is only a starting point, and that you may need to try bras a couple band and cup sizes up and down from the size that your measurements give you.
- Exhale and measure around your ribcage right under your breasts, keeping the measuring tape parallel all the way around your body. Keep the tape comfortably snug, don’t try to suffocate yourself! The number you get is what we’ll use for your band size for the time being. If you get an odd number, I recommend rounding down if you’re on the squishy side, and rounding up if you’re particularly thin or muscular.
- Now standing with your regular posture, measure over your breasts, once again keeping the measuring tape parallel to the floor. Take note of this number. The difference between your bust measurement and ribcage measurement will determine your cup size.
- One cup size is equal to one inch. So let’s use some example measurements:
If my rib cage measurement is 30 inches, and my bust measurement is 36 inches, we can determine my cup size by subtracting 30 from 36, leaving us with 6 inches. Using the idea that one inch is equal to one cup size, simply count 6 letters into the size chart to find your cup size.
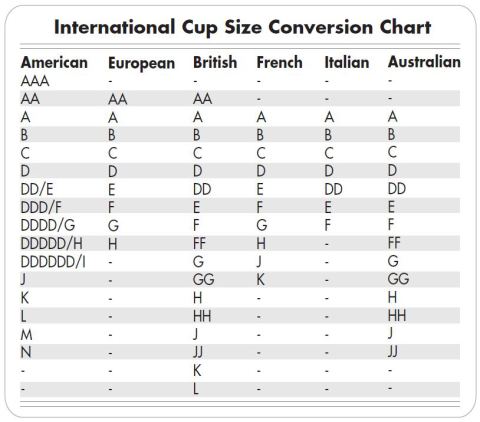
6 letters into the British size alphabet gives us an E cup. Pair that with the band measurement of 30 that we measured and voila! 30E is your starting point size.
Note that we begin counting inches at an A cup, not AA or AAA. The reason for this is that an A cup is considered a one inch difference between your bust and ribcage. AA is around half an inch, and AAA is less than half an inch.
It’s important to note that this is merely a starting point. You may need to try as many as two cup or band sizes in either direction of your measurements depending on your preferences and body shape. The measurements just help you find a size to start with since there are so darn many. Personally, I add a few inches to my band measurement because I don’t have a lot of fat tissue. Everyone’s a bit different.
Breast Shape
I find breast shape difficult to describe in words. Visual aids are much more effective in my experience. So here are a couple of images that should help you determine your own breast shape. The primary terms to think about are full on top (FOT), full on bottom (FOB), shallow breasts and projected breasts.

Image from /r/abrathatfits
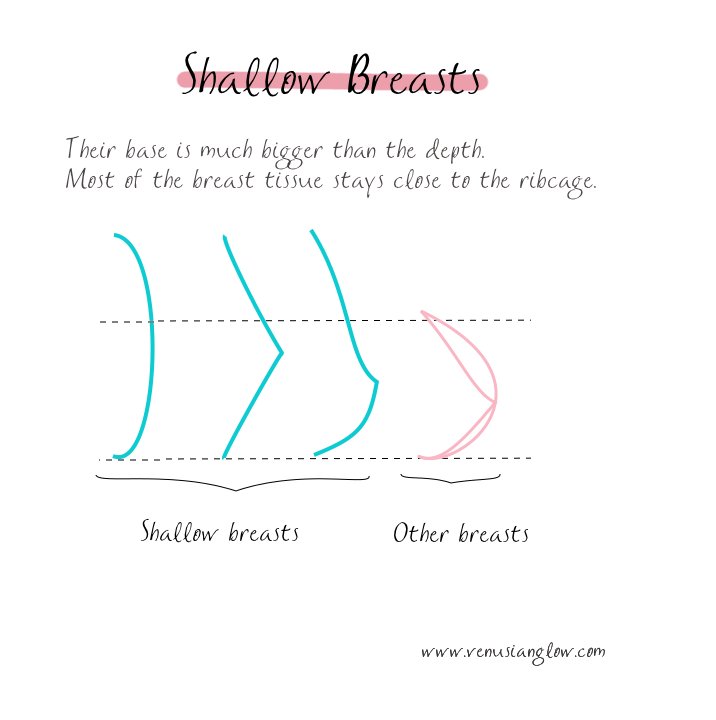
Image from Venusian Glow
Pingback: Bra Fitting Guide: A Starting Point | Undiegamer